Azure Machine Learning#
RAPIDS can be deployed at scale using Azure Machine Learning Service and can be scaled up to any size needed.
Pre-requisites#
Use existing or create new Azure Machine Learning workspace through the Azure portal, Azure ML Python SDK, Azure CLI or Azure Resource Manager templates.
Follow these high-level steps to get started:
1. Create. Create your Azure Resource Group.
2. Workspace. Within the Resource Group, create an Azure Machine Learning service Workspace.
3. Quota. Check your subscription Usage + Quota to ensure you have enough quota within your region to launch your desired compute instance.
Azure ML Compute instance#
Although it is possible to install Azure Machine Learning on your local computer, it is recommended to utilize Azure’s ML Compute instances, fully managed and secure development environments that can also serve as a compute target for ML training.
The compute instance provides an integrated Jupyter notebook service, JupyterLab, Azure ML Python SDK, CLI, and other essential tools.
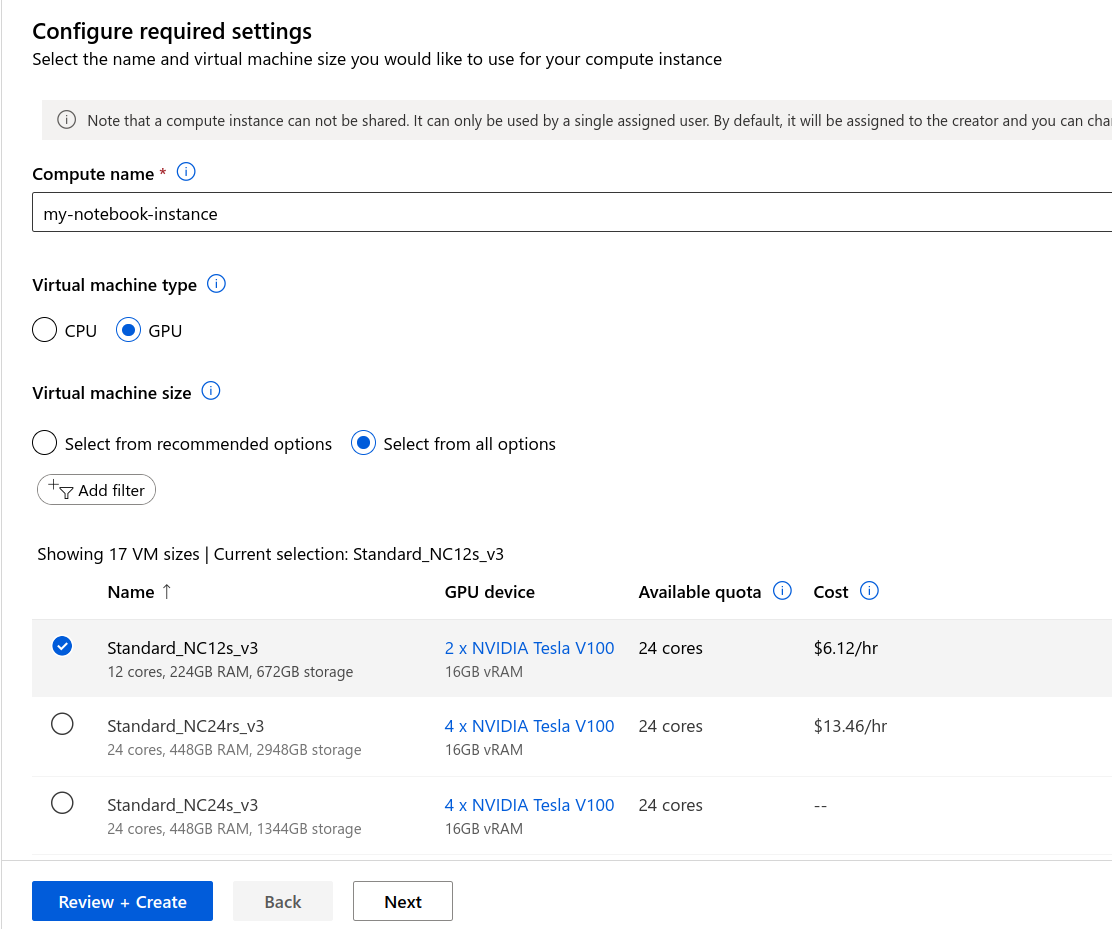
Select your instance#
Sign in to Azure Machine Learning Studio and navigate to your workspace on the left-side menu.
Select New > Compute instance (Create compute instance) > choose an Azure RAPIDS compatible GPU VM size (e.g., Standard_NC6s_v3)
Provision RAPIDS setup script#
Navigate to the Applications section. Choose “Provision with a creation script” to install RAPIDS and dependencies.
Put the following in a local file called rapids-azure-startup.sh:
Note
The script below has set -e to avoid silent fails. In case of failure, remove this line
from the script, the VM will boot and inspect it by running each line of the script
to see where it fails.
#!/bin/bash
set -e

sudo -u azureuser -i <<'EOF'
source /anaconda/etc/profile.d/conda.sh
conda create -y -n rapids \
    --override-channels \
    -c rapidsai -c conda-forge \
    -c microsoft \
   rapids=26.06 python=3.13 'cuda-version>=12.0,<=12.9' \
    'azure-identity>=1.19' \
    ipykernel

conda activate rapids

pip install 'azure-ai-ml>=1.24'

python -m ipykernel install --user --name rapids --env CONDA_PREFIX "$CONDA_PREFIX"
echo "kernel install completed"
EOF
Select local file, then Browse, and upload that script.
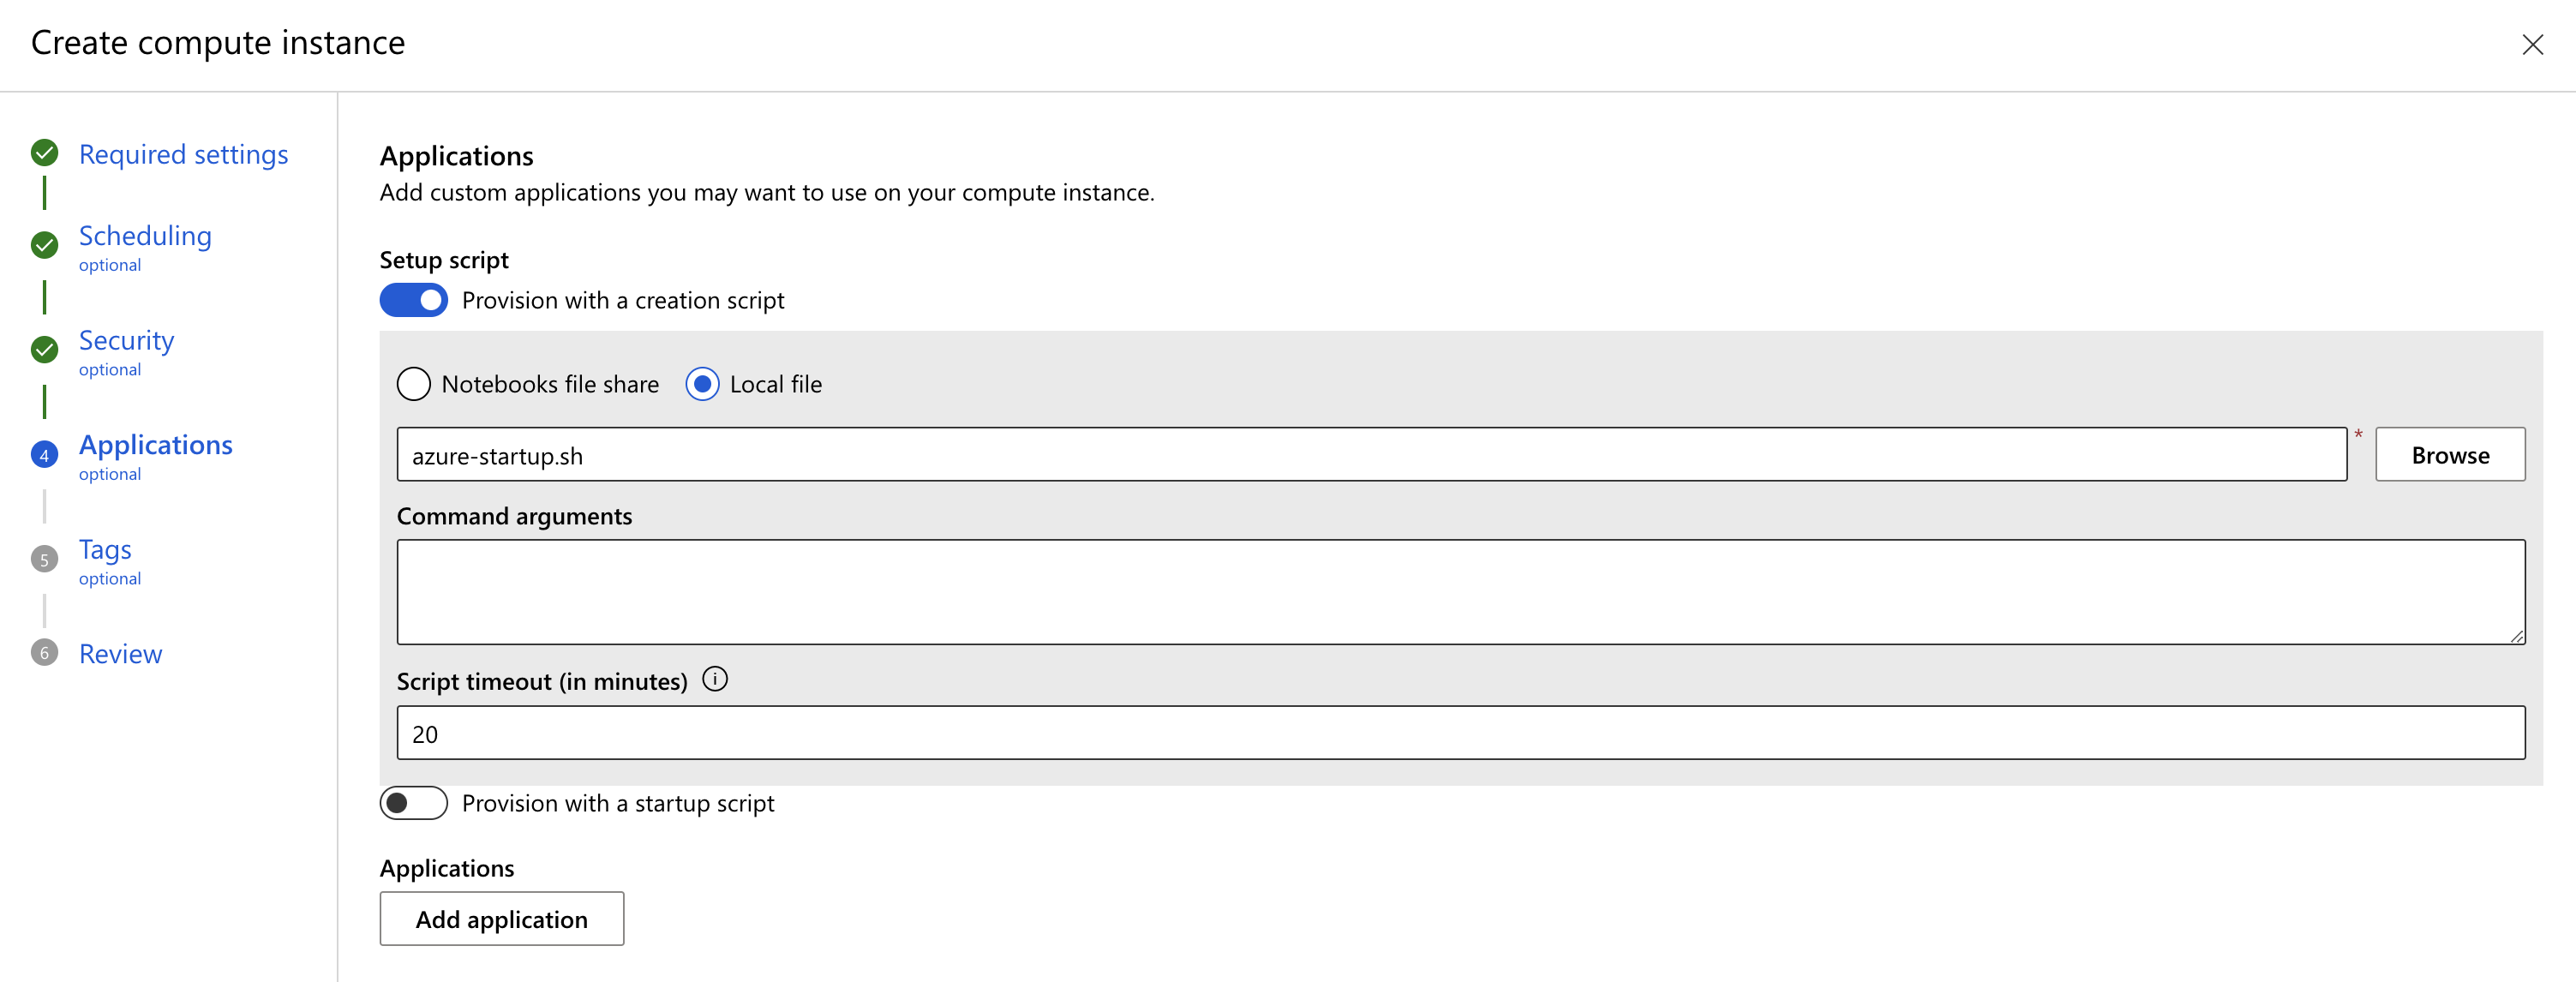
Refer to Azure ML documentation for more details on how to create the setup script.
Launch the instance.
Select the RAPIDS environment#
Once your Notebook Instance is Running, open “JupyterLab” and select the rapids kernel when working with a new notebook.
Azure ML Compute cluster#
In the next section we will launch Azure’s ML Compute cluster to distribute your RAPIDS training jobs across a cluster of single or multi-GPU compute nodes.
The Compute cluster scales up automatically when a job is submitted, and executes in a containerized environment, packaging your model dependencies in a Docker container.
Instantiate workspace#
Use Azure’s client libraries to set up some resources.
from azure.ai.ml import MLClient
from azure.identity import DefaultAzureCredential

# Get a handle to the workspace.
#
# Azure ML places the workspace config at the default working
# directory for notebooks by default.
#
# If it isn't found, open a shell and look in the
# directory indicated by 'echo ${JUPYTER_SERVER_ROOT}'.
ml_client = MLClient.from_config(
    credential=DefaultAzureCredential(),
    path="./config.json",
)
Create AMLCompute#
You will need to create a compute target using Azure ML managed compute (AmlCompute) for remote training.
Note
Be sure to check instance availability and its limits within the region where you created your compute instance.
This article includes details on the default limits and how to request more quota.
[size]: The VM family of the nodes.
Specify from one of NC_v2, NC_v3, ND or ND_v2 GPU virtual machines (e.g Standard_NC12s_v3)
[max_instances]: The max number of nodes to autoscale up to when you run a job
Note
You may choose to use low-priority VMs to run your workloads. These VMs don’t have guaranteed availability but allow you to take advantage of Azure’s unused capacity at a significant cost savings. The amount of available capacity can vary based on size, region, time of day, and more.
from azure.ai.ml.entities import AmlCompute

gpu_compute = AmlCompute(
    name="rapids-cluster",
    type="amlcompute",
    size="Standard_NC12s_v3",  # this VM type needs to be available in your current region
    max_instances=3,
    idle_time_before_scale_down=300,  # Seconds of idle time before scaling down
    tier="low_priority",  # optional
)
ml_client.begin_create_or_update(gpu_compute).result()
If you name your cluster "rapids-cluster" you can check https://ml.azure.com/compute/rapids-cluster/details
to see the details about your cluster.
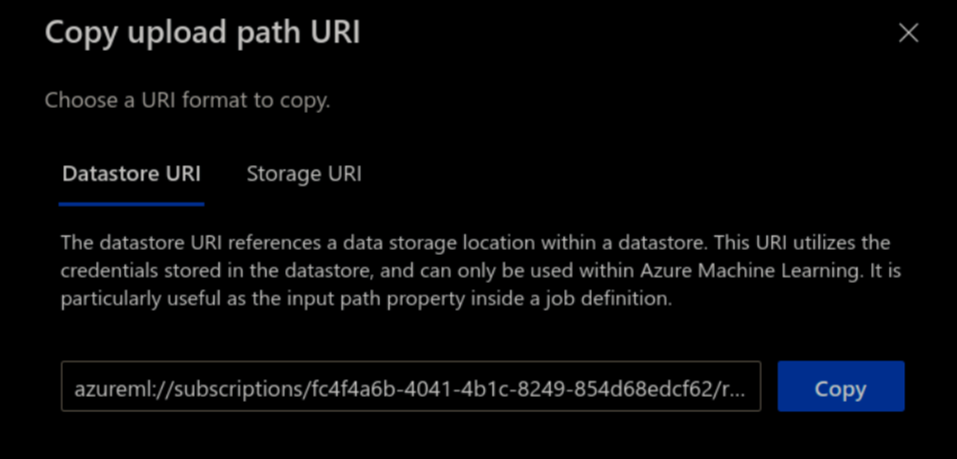
Access Datastore URI#
A datastore URI is a reference to a blob storage location (path) on your Azure account. You can copy-and-paste the datastore URI from the AzureML Studio UI:
Select Data from the left-hand menu > Datastores > choose your datastore name > Browse
Find the file/folder containing your dataset and click the ellipsis (…) next to it.
From the menu, choose Copy URI and select Datastore URI format to copy into your notebook.
Custom RAPIDS Environment#
To run an AzureML experiment, you must specify an environment that contains all the necessary software dependencies to run the training script on distributed nodes.
You can define an environment from a pre-built docker image or create-your-own from a Dockerfile or conda specification file.
In a notebook cell, run the following to copy the example code from this documentation into a new folder, and to create a Dockerfile to build and image that starts from a RAPIDS image and install additional packages needed for the workflow.
%%bash
mkdir -p ./training-code
repo_url='https://raw.githubusercontent.com/rapidsai/deployment/refs/heads/main/source/examples'

# download training scripts
wget -O ./training-code/train_rapids.py "${repo_url}/rapids-azureml-hpo/train_rapids.py"
wget -O ./training-code/rapids_csp_azure.py "${repo_url}/rapids-azureml-hpo/rapids_csp_azure.py"
touch ./training-code/__init__.py

# create a Dockerfile defining the image the code will run in
cat > ./training-code/Dockerfile <<EOF
FROM nvcr.io/nvidia/rapidsai/base:26.06-cuda12-py3.13

RUN conda install --yes -c conda-forge 'dask-ml>=2024.4.4' \
 && pip install azureml-mlflow
EOF
Now create the Environment, making sure to label and provide a description:
from azure.ai.ml.entities import Environment, BuildContext

# NOTE: 'path' should be a filepath pointing to a directory containing a file named 'Dockerfile'
env_docker_image = Environment(
    build=BuildContext(path="./training-code/"),
    name="rapids-mlflow",  # label
    description="RAPIDS environment with azureml-mlflow",
)

ml_client.environments.create_or_update(env_docker_image)
Submit RAPIDS Training jobs#
Now that we have our environment and custom logic, we can configure and run the command class to submit training jobs.
inputs is a dictionary of command-line arguments to pass to the training script.
from azure.ai.ml import command, Input
# replace this with your own dataset
datastore_name = "workspaceartifactstore"
dataset = "airline_20000000.parquet"
data_uri = f"azureml://subscriptions/{ml_client.subscription_id}/resourcegroups/{ml_client.resource_group_name}/workspaces/{ml_client.workspace_name}/datastores/{datastore_name}/paths/{dataset}"
command_job = command(
environment=f"{env_docker_image.name}:{env_docker_image.version}",
experiment_name="test_rapids_mlflow",
code="./training-code",
command="python train_rapids.py \
--data_dir ${{inputs.data_dir}} \
--n_bins ${{inputs.n_bins}} \
--cv_folds ${{inputs.cv_folds}} \
--n_estimators ${{inputs.n_estimators}} \
--max_depth ${{inputs.max_depth}} \
--max_features ${{inputs.max_features}}",
inputs={
"data_dir": Input(type="uri_file", path=data_uri),
"n_bins": 32,
"cv_folds": 5,
"n_estimators": 50,
"max_depth": 10,
"max_features": 1.0,
},
compute=gpu_compute.name,
)
# submit training job
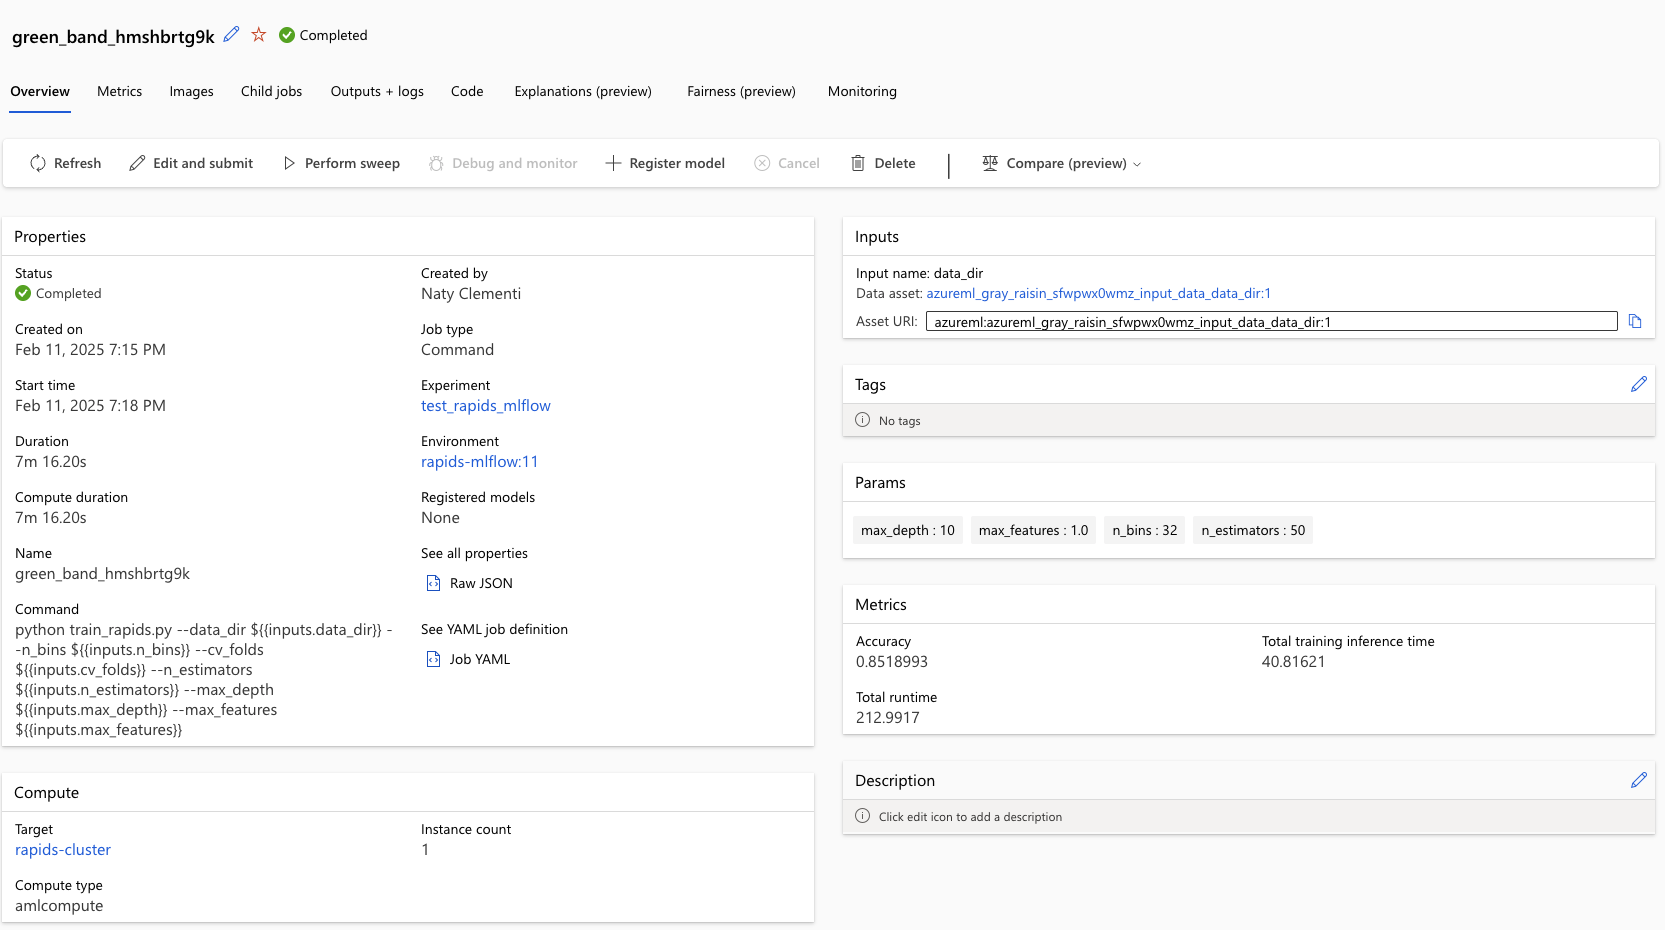
returned_job = ml_client.jobs.create_or_update(command_job)
returned_job # displays status and details page of the experiment
After creating the job, click on the details page provided in the output of returned_job, or go
to the “Experiments” page to view logs, metrics, and outputs.
Note
For reference this job took ~7 min while using size="Standard_NC6s_v3" in the gpu_compute creation
Next, we can perform a sweep over a set of hyperparameters.
from azure.ai.ml.sweep import Choice, Uniform

# define hyperparameter space to sweep over
command_job_for_sweep = command_job(
    n_estimators=Choice(values=range(50, 500)),
    max_depth=Choice(values=range(5, 19)),
    max_features=Uniform(min_value=0.2, max_value=1.0),
)

# apply hyperparameter sweep_job
sweep_job = command_job_for_sweep.sweep(
    compute=gpu_compute.name,
    sampling_algorithm="random",
    primary_metric="Accuracy",
    goal="Maximize",
)

# setting a very small limit of trials for demo purposes
sweep_job.set_limits(
    max_total_trials=3, max_concurrent_trials=3, timeout=18000, trial_timeout=3600
)

# submit job
returned_sweep_job = ml_client.create_or_update(sweep_job)
returned_sweep_job
Once the job is created, click on the details page provided in the output of returned_sweep_job, or go
to the “Experiments” page to view logs, metrics, and outputs. The three trials
set in the sweep_job.set_limits(...) take between 20-40 min to complete when using size="Standard_NC6s_v3".
Clean Up#
When you’re done, remove the compute resources.
ml_client.compute.begin_delete(gpu_compute.name).wait()
Then check https://ml.azure.com/compute/list/instances and make sure your compute instance is also stopped, and deleted if desired.